He's here! Well, actually he's been here for 3 weeks now. I just hadn't gotten around to blogging about it (or anything else for a while).
Introducing 'Newbie'.
He looked just like his big brother at birth but a day or two later he started to look a lot like me as a baby, whereas Geekling looked just like his daddy.
Geekling is so very sweet with him, and so excited to be a big brother. He loves to help burp his little brother, wet cloth wipes with the squirt bottle for nappy changes, read and sing to Newbie, kiss cuddle and hold him. We haven't yet seen any jealousy or negative emotion towards his new sibling at all.
Hubby and I are a lot more relaxed as second-time parents, and I think that's helped relax Newbie a bit too. I'm getting a reasonable amount of sleep, my boobs are doing fine and I am generally feeling much brighter and happier than I was after Geekling's arrival.
Showing posts with label Baby. Show all posts
Showing posts with label Baby. Show all posts
Monday, 28 October 2013
Saturday, 20 July 2013
Slip cover for my glider chair
In getting the nursery ready, I had to decide what to do with my old glider. While it works just fine, the vinyl was worn and flaky, and it looked pretty awful.
Getting it reupholstered was going to be hideously expensive. We considered selling and buying a cheaper feeding chair but we likely wouldn't get much money selling it given how bad it looked.
I stumbled across this glider makeover on Pinterest. Its a much neater job than mine as the blogger has reshaped her glider beautifully to allow a nice, boxy designed cover to fit.
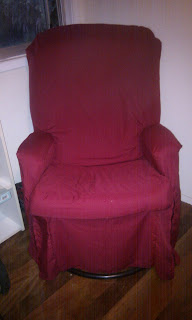
I bought a cheap single bed sheet in a nice dark colour and got chopping. I made a fitted-sheet style cushion cover for the seat as it does not detatch but flips up, them sewed two larger pieces for the backrest and a fiddlier piece for the arm rests and front-skirt.
Here it is - Its not as neat as the other blogger's but its a grand improvement!
Before photo
Getting it reupholstered was going to be hideously expensive. We considered selling and buying a cheaper feeding chair but we likely wouldn't get much money selling it given how bad it looked.
I stumbled across this glider makeover on Pinterest. Its a much neater job than mine as the blogger has reshaped her glider beautifully to allow a nice, boxy designed cover to fit.
I bought a cheap single bed sheet in a nice dark colour and got chopping. I made a fitted-sheet style cushion cover for the seat as it does not detatch but flips up, them sewed two larger pieces for the backrest and a fiddlier piece for the arm rests and front-skirt.
Here it is - Its not as neat as the other blogger's but its a grand improvement!
Monday, 1 July 2013
Home made change mat cover
The baby-sewing has begun!
I'm not into pastels, or pink. I couldn't find a nice, bright change mat cover in a colour I liked, so I decided to sew my own. I had planned to use minky, but it was $23 a meter! This gorgeous purple crushed velvet was only $4 a meter, though it was very slippery and difficult to sew with.
I used 1 meter of material and 1 meter of elastic ($1/m) per mat. So they cost $5 each! I made two as I know they'll need to be washed pretty often, so a spare will be handy.
I followed this tutorial, but rather than folding the material and cutting one corner out, I lay my material flat on the loungeroom floor, traced my change mat, then cut away the corners. From there it went pretty well as per the tutorial.
Here's the finished product - I love the colour, the lustre and its sooooo soft that I wish I had something like this under my bare bum regularly!
I might make more in future as baby shower gifts, but will definitely use a different fabric that is easier to work with!
Subscribe to:
Posts (Atom)


