Showing posts with label Upcycling. Show all posts

Saturday, 20 July 2013

Slip cover for my glider chair

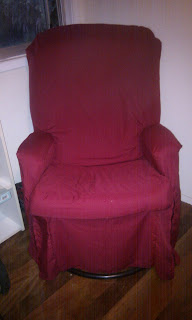
In getting the nursery ready, I had to decide what to do with my old glider.  While it works just fine, the vinyl was worn and flaky, and it looked pretty awful.

Before photo

Getting it reupholstered was going to be hideously expensive.  We considered selling and buying a cheaper feeding chair but we likely wouldn't get much money selling it given how bad it looked.

I stumbled across this glider makeover on Pinterest.  Its a much neater job than mine as the blogger has reshaped her glider beautifully to allow a nice, boxy designed cover to fit.

I bought a cheap single bed sheet in a nice dark colour and got chopping.  I made a fitted-sheet style cushion cover for the seat as it does not detatch but flips up, them sewed two larger pieces for the backrest and a fiddlier piece for the arm rests and front-skirt.

Here it is - Its not as neat as the other blogger's but its a grand improvement!


Friday, 8 March 2013

Geekling's upcycled play kitchen

Firstly, apologies for the extended break.  I've got a mixture of excuses, most of which are pretty weak, and I won't bore you with them.

Those who follow me on Pinterest will see I've pinned a couple of TV-Cabinets turned into Play Kitchens, and I've been meaning to do it for Geekling for a while.  When I asked him what he'd like for his 3rd birthday he said "a green kitchen", so I knew it was time to get cracking!

Here's a before photo of the TV cabinet we picked up from Ebay for $10.  We've removed the glass cabinet door and cut the sink hole already.  Its less than glamourous surrounds is our storage/work area under the house.


We sanded, painted (with paint purchased from the tip recycling centre for $2), installed a new MDF 'fridge' door, installed an old metal bowl as a sink and old tap salvaged from my in laws shed, used paint and IKEA foam coasters for the hot plates.  We still need to put hotplate / oven knobs on but not sure how best to attach them.  We also plan to turn the cupboards below the sink into an oven and dishwasher down the track.

Here's the (mostly) finished product upstairs ready for use!


Geekling LOVES it.  His favourite thing to cook is "spicy chocolate balls" and cups of tea and coffee.  Its so sweet to watch him 'cooking'.  He stirs with a whisk or spoon then taps it on the side of the pot or bowl just like I tend to do and whispers to himself as he works.

Saturday, 10 March 2012

Geekling's bedroom - 2 years old

Now that Geekling is toilet trained, we've sold his nappy change table (for almost double what we'd bought it for! $45 second hand off ebay 2 years ago, sold for $80 on ebay recently).  We moved his chest of drawers to where his change table had been, moved his bookshelf to where his drawers had been and put up the play tent I made him for his birthday.  We've also now got an easel his Grandma gave him, and we blew up balloons for his birthday!


The playtent is just a hula hoop ($5), a queen bed sheet donated by Geekling's Grandma and a bunting donated by Lumpy's Mum.  The tutorial I followed is here.

Geekling LOVES the tent, loves his new Very Hungry Caterpillar bedsheets and pillow and his easel!

I love comparing photos and seeing how his bedroom has evolved.

Previous posts about Geekling's room:
Geekling's newborn nursery
Geekling's new bed

Friday, 6 January 2012

Taggie Owl Rattles

I made these taggie owl rattles for my two new nephews and our friend's new baby for Christmas using the pattern from  Dolls and Daydreams.  Each has is made from scraps of fabric I had at home, and features double seams and two bells in the head which jingle well even though surrounded by polyfill.  My hand stitching at the bottom leaves a lot to be desired, but overall I am happy with them.


 Hoot hoot!

Monday, 28 November 2011

Chicken pen

Two reasons its been a bit quiet on this blog lately:

1. My laptop is dying

2. We've been spending our weekends building a chicken pen for our chickens.  And here it is!


The frame is made from recycled pool fencing that had been sitting around hubby's parents place for the best part of the last decade.  While it is excellent to be able to use the gate part, I wouldn't recommend it as it is SOOOO heavy.  Or at least I would not recommend situating the new chook pen at the very far uphill corner of the yard.

The frame posts are secured with recycled star pickets donated by our neighbour.  It is covered with chicken wire and recycled corregated iron from the nearby Dakabin Tip Treasure Market.  We ran bricks around the outside to stop the dog (or anything else) digging under it.

The chook house is a dog kennel I purchased recently on ebay for $10.  The lid is on a hinge so lifts for easy access to the eggs (when they start laying) and for cleaning.  The ramp is made from a bit of pine with backyard sticks glued to it.

The chooks seem happy enough with it but they haven't yet worked out how to get up into the chook house which I find odd since I thought they naturally go to the highest point.

Wednesday, 16 November 2011

Op shop Montessori bargains

Purchasing Montessori materials can be expensive if you shop at Montessori stores and sites, but if you keep an eye out you can find similar items at markets and op shops.  Here is my haul from a local op shop last weekend that cost a total of $14 (and that included some shorts and a tshirt for Geekling also!).


I plan to use the metal trays to present tasks and activities, the scoop, funnel and seive in sensory tubs, the ceramic jugs for pouring activities and the egg cups are for our weekend breakfasts but may paint or polish the two unfinished ones.

Saturday, 29 October 2011

Reducing waste in the home

I'm a bit of a greenie at heart and fairly frugal, so my motivation for reducing waste and converting to reuseable products where possible is two-fold: save the environment and save money.  It is also very satisfying to glide by all the products you no longer need in the supermarket - our fortnightly shops are usually $120 - $140 which I understand is pretty good for a small family.  Here are examples of reuseable products or other ways that we reduce waste:
  • Watering down products - You'll be amazed the number of products you can water down or use less of.  A plumber friend told me it is actually better for your dishwasher to use half measures of powder!  Try using half as much powder in your dishwasher, clothes washing and using less shampoo and conditioner.  I also tend to water down my liquid soap, shampoo, conditioner and moisturisers with about 1/3 water.  Lastly, once your white vinegar gets half-empty, top it up with water and leave it in a sunny spot for a couple of days and it will reach full-strength again.  You can continue doing this 3 or 4 times with the same bottle.  Vinegar has a myriad of uses around the home - try using it in your house cleaning.
  • Make your own - we make our own bread, pizza bases, yoghurt, muffins, meatballs, pikelets and more.  We save the end-pieces of bread and any imperfect slices, blitz them in the food processor for home-made breadcrumbs.
  • Grow your own - herbs are the easiest way to get started and save so much money by not buying fresh herbs by the bunch.  The best bit is the more you harvest, the better and faster they grow!  Vegies and fruit trees are also a fantastic way to grow your own but I must admit we've had mixed success with those.
  • Use less meat - In stir-fries, curries and other dishes we generally use 1/3 - 1/2 of the meat a recipe requests.  For dishes in which a fillet is the main component we try to stick to the 150 - 180g serving size per adult, halving one fillet between us if necessary.  As meat is often the most expensive ingredient in a meal, this can save a lot of money!
  • Find uses for kitchen scraps and leftovers - use leftovers as pizza toppings or sandwich fillers, or freeze unused portions of wine and sauces in ice cube trays or zip-lock bags and meals in single or kid-sized portions.  Use stray vegies at the end of the fortnight to make stocks and freeze.  Feed scraps to chickens if you have them (or someone elses' if you know anyone with chooks) or start a compost or worm farm.
  • Tea towels, handkerchiefs and terry towel nappies - We generally don't buy tissues or paper towel, but use reuseable cloth options and simply wash them and reuse.
  • Feminine Hygeine - I use a Femmecup, which is basically a small latex cup that is inserted much like a tampon, emptied, rinsed and reused over and over.  I haven't purchased pads or tampons in a long time, and it paid for itself in a matter of months but has an expected lifespan of 10 years.  There are many other brands available or other options such as cloth pads.
  • Nappies - we use modern cloth nappies full time.  They are just as easy to use as disposeables, and so cute!  Almost all of our nappies are "one size fits most" and have been used since Geekling was 2 weeks old through to now (almost 20 months and counting).  Here's a couple of photos of Geekling in the same nappy at 5 weeks and again at 1 year - the same nappy still gets used but I don't have a more recent photo.


Tuesday, 27 September 2011

IKEA Hacks

Hello, my name is Simone and I'm an IKEA addict.  I will go to buy just ONE thing and come out having spent three times as much on smaller items I came across instore.  And we love their meatballs!

I'm no stranger to IKEA Hackers, but I came across this link of 20 IKEA Hacks to try (some are also featured on IKEA Hackers) and simply had to share!

On the menu leading up to Christmas and Geekling's birthday is to adapt an old LACK side table into a lightbox table for Geekling, add some BEKVAM spice racks as book display shelves to his room and make a play kitchen.

Saturday, 20 August 2011

Calendar Puzzles

These are some calendar puzzles that I have had for a while but haven't shared yet.  I am pretty sure I got this idea from Chasing Cheerios although I can't find the post to link.  I bought a couple of calendars in May when 2011 calendars were reduced to $1.  I got one of cats and one of dogs, took a picture from each and glued them back to back with spray adhesive.

Cat puzzles showing the different shaped pieces 

On the other side, dog puzzles showing the pieces connected

I covered one in clear contact film, but it wasn't as neat as I'd like and the ones I didn't cover have held up well enough to a toddler's rough hands.  I will probably make some more when Geekling tires of the same three or when I think he is ready to move on to four-piece puzzles.

Tuesday, 19 July 2011

Upcycled Hula Hoop floor rug

I know - this many posts in one day is unheard of around here but I had to share this also, I found this awesome Hula Hoop Rug using old t-shirts via The Crafty Crow.


Hardware stores around here sell huge bags of old clothing and other fabric to use as rags for $1 or $2 which might also be useful if you don't have that many old shirts and other clothes hanging around.

Saturday, 4 June 2011

Paint Chip Bead Toy

I came across this gorgeous home made toy (via The Crafty Crow), where the beads have been made from paint chips (the colour matching slips you can pick up from the hardware store).


As a child I was enchanted by paint chips, so this idea really thrilled me.  I'd like to make one for Geekling starting with just 3 or 4 shades each of red, yellow and blue and work up to something like this.  Just gorgeous!

I've also seen other wonderful ideas at Chasing Cheerios - Using paint chips to practice cutting with scissors as the thick white lines separating the shades of colour are a great guide for toddlers, and this home-made peg colour-matching game.

Friday, 13 May 2011

Dyeing Playsilks with Kool-Aid

I know, I know, every craft or parenting blog on the planet has a post about dying playsilks or yarn or other products with Kool-Aid.  But I did it recently, had a lot of fun doing it so am going to give you the run down :)

I ordered the 1m square silks from Dharma Trading Co, and the Kool-Aid on ebay because its not usually sold here in Australia (or if it is, its at expensive imported candy stores - although I have some other colours/flavours to collect from a Canadian online store that allows pickup from a French patisserie in the city).  I planned to dye pink, red, orange, yellow, green, blue, purple and leave one white.

Clockwise from top left: Yellow silk dyed with 3 packs Lemonade and 1 pack Mango, Blue silk dyed with 4 backs Blue Berry, Pink silk dyed with 3 packs Pink Lemonade and the Orange silk was dyed with 4 packs of Orange.
 Step 1: Dump silks in hot water with a fairly good glug of vinegar.  I think there would be a cup or so in this pan with the hot water.  Soak for 15 - 30 minutes (although I am sure longer won't hurt) while you prepare the dye.
 Step 2: gather containers for the dye baths.  You can use glass or metal but not plastic as it will stain and absorb the smell and flavour a little.  Kool-aid and vinegar are foods and not toxic so you can use your every day cookware.
 Step 3: Empty the Kool-aid into the containers, then add hot water and a good splash of vinegar.  I think there is about a cup and a half of hot water in each container.
 Step 4: Add silks to the dye baths and move and squish around fast if you want the most even coverage.  Keep squishing and moving until the water left in the container looks milky or pretty clear - its actually really cool seeing how fast the dye attaches to the silk!
 Oh yeah, wear gloves if you have them.  This stuff stains!!!  If you don't have gloves and are itching to dye, washing your hands well with toothpaste afterwards will remove most the dye, except around the edges of your nails.  I hear shaving cream works too?
 My orange silk being dyed.
 Step 5: Rinse under COLD water until water is running clear.  Then hang out to dry!
 Step 6: PLAY!!!  Geekling loves kicking his legs around in them, throwing them over his head and loves to play peek-a-boo with us.

I just love how vibrant the colours turned out, I think because I was heavy handed with the vinegar?  Some I've seen online are a lot paler.  I'm looking forward to completing the set with Purple, Green and Red soon!

Wednesday, 13 April 2011

Homemade Pat Mat

I made Geekling a pat mat once before following a bathroom clean out - Hubby had a jar of hair gel that he had only used once years ago.  Rather than throw it out, I tipped it into a zip-lock bag and watered it down to the perfect consistency and added some red food dye.  Sadly, the only zip-lock bags I had at the time that were large enough were vege steamer bags and had instructions and branding all over them.

Now that we have some nice big plain zip-lock again, last night I snipped a corner off the old one and squeezed the contents into a new plain zip-lock bag, added a little more water and dye, and some glitter.  I taped it to Geekling's highchair tray.


Then the agonising wait til morning to see if he liked it.


Success!  Geekling loved it.  He was fascinated by pressing it and having the thick liquid content move about to reveal the white of the high chair tray underneath.  When he is a bit older a homemade mat like this will be great Montessori style aid for teaching him letters as the large letter can be drawn on the underside of the mat in permanent marker or on a piece of paper under the mat for him to trace.

I think the same thing could be achieved using shampoo, conditioner or any number of bathroom lotions (the latter two of which would be more opaque).  You'd probably need little or no water added if you used these substitutes.